Tiny Home Setup Made Simple
How to Prepare Your Property for a Park Model RV Tiny Home
This guide covers everything you need to do to get your property ready for delivery - ground prep, setting and leveling, utility hookups, and recommended contractors.
For production timelines, delivery coordination, and what happens from order to move-in, visit our Delivery & Setup page. If your home is arriving soon, see our Delivery Day Checklist for what to expect on arrival day.
Watch: Property Prep Explained
This short video walks through everything covered in this guide. Watch first, then use the steps below as your reference.
Ground Preparation & Site Surface
Before delivery, the site must be prepared to support the weight of the park model and allow for proper leveling. Bare dirt or soft ground is possible but not recommended - it compresses unevenly, traps moisture, and causes the home to settle or shift over time.
Common Site Prep Options
- Compacted gravel or crushed rock - A 5-8 inch thick, fully compacted base is the most common option. Proper compaction is critical to prevent settling under the home's weight over time.
- Concrete pad - A poured concrete pad provides a very stable long-term surface and is a good option when site conditions allow.
- Engineered surfaces - Depending on terrain, soil type, and drainage, other solutions may be appropriate. Your setting contractor can help determine the best option for your specific site.
Setting & Leveling the Home
After delivery, the home will be set and leveled using block setting on concrete blocks or pier setting on metal piers. This is done by specialists and is something we can help schedule when you order your home.
Proper setting and leveling directly affects how the home feels, how systems function, and how the structure holds up over time. A home that is not properly supported can experience door and window alignment issues, floor flex, frame stress, and the need for early re-leveling.
What Setting Includes
- Supporting the frame at designated load points
- Leveling the home side-to-side and front-to-back
- Removing transport stress from the chassis once placed
- Creating a stable base that resists settling over time
Depending on location, wind exposure, and local requirements, additional stabilization such as tie-downs or anchoring may be recommended. These measures reduce movement in high-wind areas and improve long-term stability.
Skirting
Skirting closes the gap between the ground and the bottom of the home. It cleans up the look, hides blocks or piers, protects plumbing and wiring, and reduces drafts under the floor.
- Material options: vinyl, metal, engineered wood, composite, or insulated systems
- Add vents or a vented access door for airflow and service access
- Lay a ground moisture barrier when possible
- Seal around utilities and maintain clearances to siding
Stairs
Park Model RVs sit slightly elevated once leveled, so stairs are required for entry. Stairs are not included in the base price of the home - they are added after installation since site conditions and stair styles vary widely.
Most setups require 3 to 4 steps depending on how the home is leveled. Common options include basic wood stairs, pre-made metal steps, or custom composite systems. If you would like help, our team can assist with building stairs and the cost can be added to your home invoice.
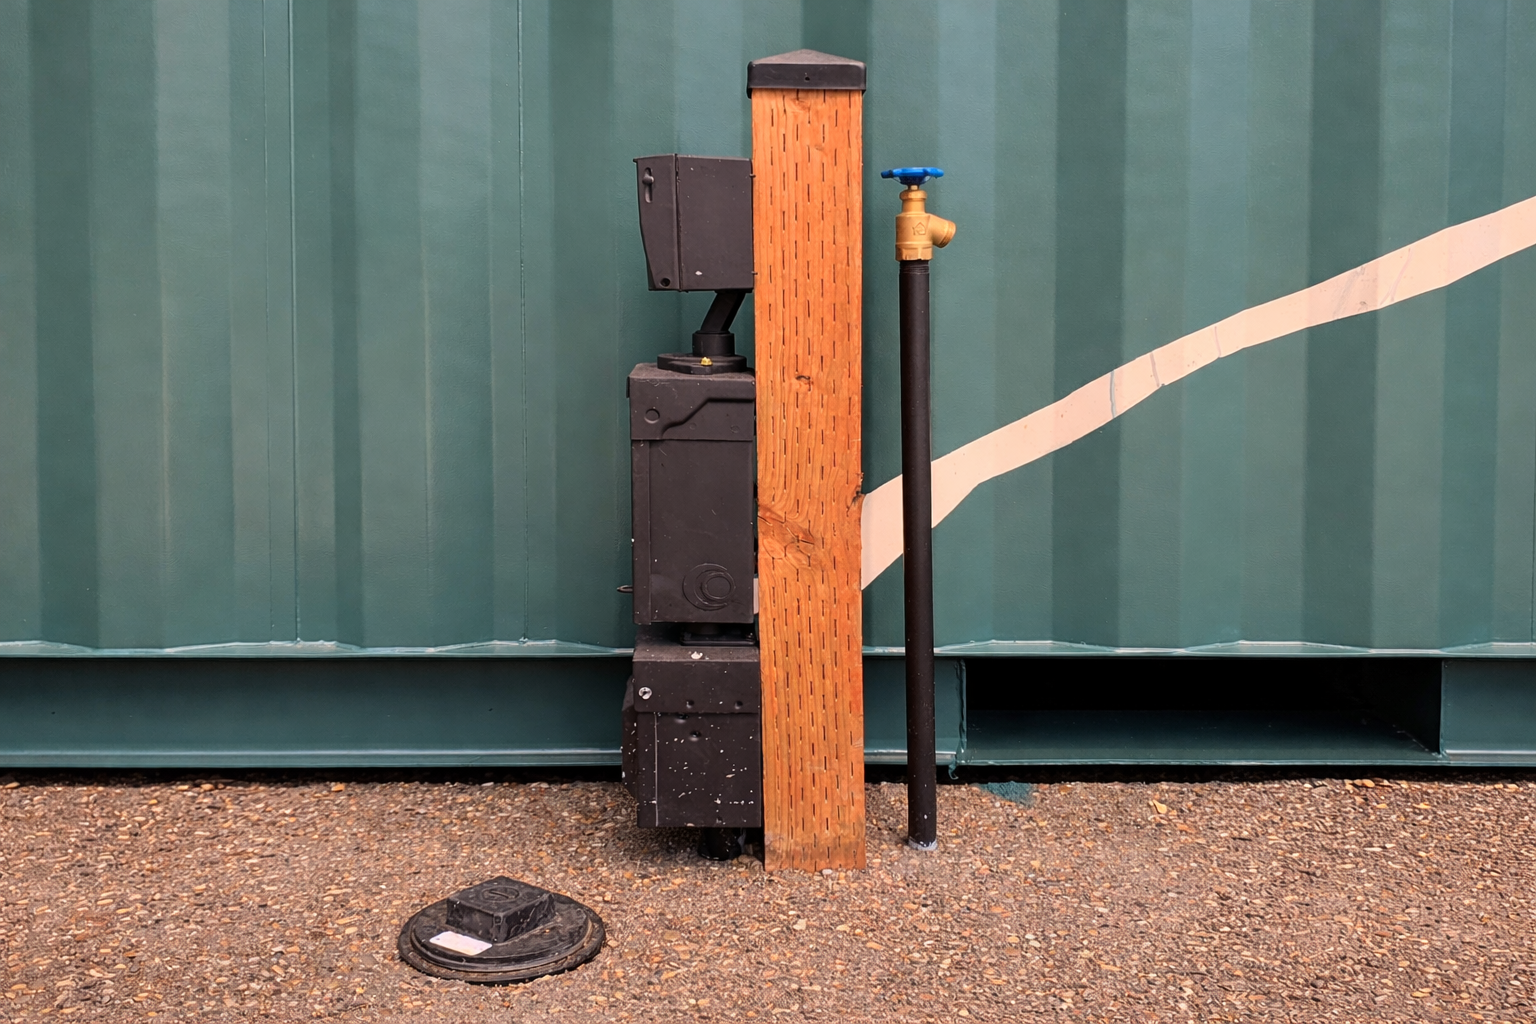
Example of 3 of the 4 RV style utility hookups. Sewer on the left, 50 amp electric in the middle, and water connection on the right.
Utility Hookups
Connecting utilities is usually simpler than people expect. Park Model RVs use standard RV-style hookups that most licensed professionals are already familiar with. These homes are RVIA Certified ANSI 119.5 Park Model RVs and just need traditional RV connections.
Electrical
A licensed electrician will install a standard 50-amp, 120/240V, 4-prong RV outlet, or hardwire the connection if required. We perform an amperage load calculation based on your selected options. Homes with higher-demand appliances such as electric ranges or electric dryers may require 100-amp service - your order summary will confirm what you need.
Ask for:
- 50 amp, 120/240V, 4-prong RV hookup or 100 amp service depending on the home's load
- Weather-resistant RV pedestal or disconnect near the home
- Shore power connection compatible with a Park Model RV
Water
Water service can be as simple as a standard hose-size connection or a direct water line tied into the home. A shut-off valve near the home is recommended for easy access.
Ask for:
- Standard RV-style water connection to city water or an approved well
- Shut-off valve installed near the home
Sewer & Septic
Waste connections tie into an existing sewer line or septic system using an RV-style connection. Local permits may be required depending on jurisdiction. This is not a full residential plumbing system - connections are RV-style and remain serviceable and accessible.
Ask for:
- RV-style sewer connection tied into the existing sewer mainline or a septic system approved for RV use
- Standard RV waste inlet compatible with Park Model RVs
Gas & Propane
Homes built with gas ranges can use natural gas or propane. Propane setups use the manufacturer-included conversion kit found in the owner's manual.
Ask for:
- Propane tank installation and hookup for a Park Model RV
- Connection to range, oven, or other propane appliances
- Pressure testing and final hookup after placement
- Conversion using the kit included with the home
Recommended Contractors
These are independent, licensed professionals we recommend who are already familiar with Park Model RV setups. They can handle everything from basic hookups to full end-to-end site prep.
Electrical
Alameda Electric
Service Area: Oregon & Washington
Our primary point of contact for Park Model RV electrical setups. Garrett and the team specialize in coordinating these projects.
Website: alamedaelectricpdx.com
Phone: 503-863-6887
Email: info@alamedaelectricpdx.com
Plumbing & Water
Blackcat Plumbing
Service Area: Oregon only
Website: blackcatplumbing.com
Phone: 503-788-0300
Email: info@blackcatplumbing.com
Propane
Setting & Leveling
NWT Setting
Services: Block setting, pier setting, re-leveling
Service Area: Oregon only
Email: info@nwtinyhomes.com
Re-Leveling Pros / On Level Services
Services: Block setting, pier setting, Diamond Pier Setting for permanent foundation, re-leveling, foundations, tie-downs, skirting, and more
Service Area: Oregon, Washington, Idaho, Colorado
Website: relevelingpros.com
Questions? We Are Here to Help.
We handle transport coordination and can connect you with contractors who specialize in Park Model RV setups. If you have questions or want help planning your property prep, reach out anytime.